

Setting up a website on Netlify with a Namecheap domain: A step-by-step guide


This was not the article next planned but I feel compelled to delve into this subject matter, as I was unable to find any good article/blog related to this topic which would have helped me to set up my personal website on Netlify with the Namecheap domain (sarthakkathpalia.com some publicity 😝). Let me know in the comments if you guys need an article on buying a domain also, will surely make one.
Let's start the blog by gaining some knowledge. So, what exactly is a domain? A domain is a unique address that is used to identify and locate websites on the internet. Types of Domains:-
Apex Domain (Root Domain): The apex domain is the main domain that represents the highest level in the domain hierarchy. It does not contain any subdomains and typically consists of a top-level domain (TLD) and a domain name. For example, in the domain
example.com, "com" is the TLD and "example" is the domain name.Subdomain: A subdomain is a sub-division of the main domain that is created to organize and categorize specific sections or functionalities of a website. It is added as a prefix to the apex domain and separated by a dot. For instance, in
blog.example.com, "blog" is the subdomain.
Moving ahead, I am assuming that you've purchased your domain on Namecheap. The domain registrar, Namecheap, has nothing to do with the content. The website's GitHub repository will be connected to Netlify. Every time you update the repository, Netlify will update the website. The ultimate objective is to connect your domain to your Netlify site.
The steps are as follows:-
Click on the “New Site from Git” button present on the homepage and follow the screen guide. After it’s completed, you will get a URL of your Netlify site in a format as
name-of-your-site.netlify.app. Generally, a very weird name is given to your site, which you can change by clicking "Options" and then "Edit site name".By the time Netlify deploys your site, you can add your custom domain. In the left panel click on
Site Settings › Domain Management › Domains. Then selectAdd a domain. Here put the domain you have purchased from Namecheap. Follow the guide.Now setting up DNS records for your domain. You will be able to see the domains you have added in the previous step, under the
Production domains. Click onSet up Netlify DNS. Now wanted to tell you people that, this was the major step missing in almost all the articles or videos I watched.In the DNS panel click on
Add a new record=>Create CNAME recordRecord Type:
CNAME
Name:www
Value:name-of-your-site.netlify.appClick on
Save
=>Create A recordRecord Type:
A
Name:@
Value:75.2.60.5(Netlify’s IP address, provided in Netlify Docs)Save it.

Keep the page open after creating the entries since we will need the data under
Name serverslater, to point your domain’s name servers to Netlify.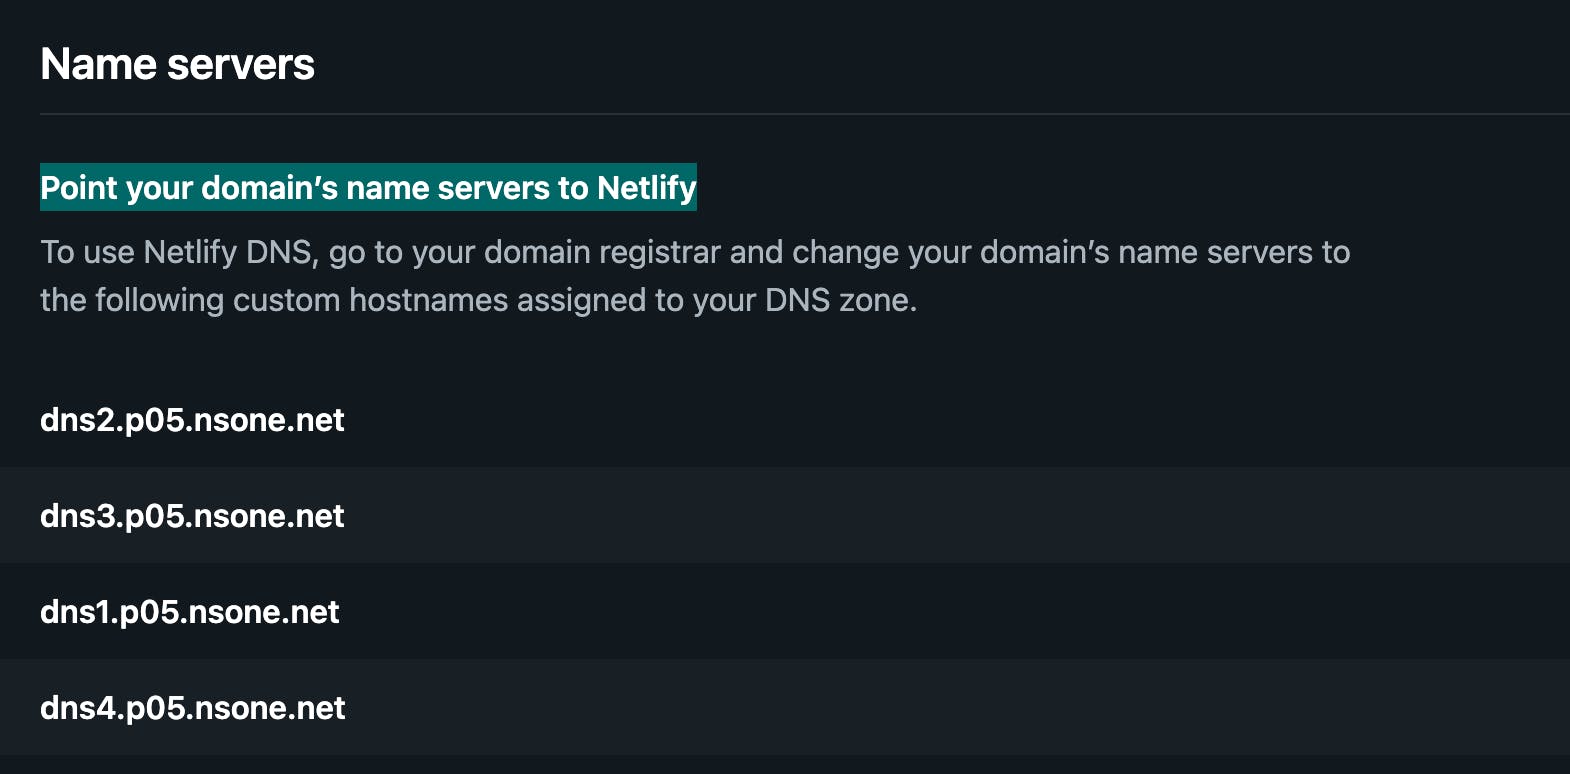
Setting up Namecheap:-
Go to the Namecheap homepage.
Navigate to the "Manage" section.
Click on the "Domain" option.
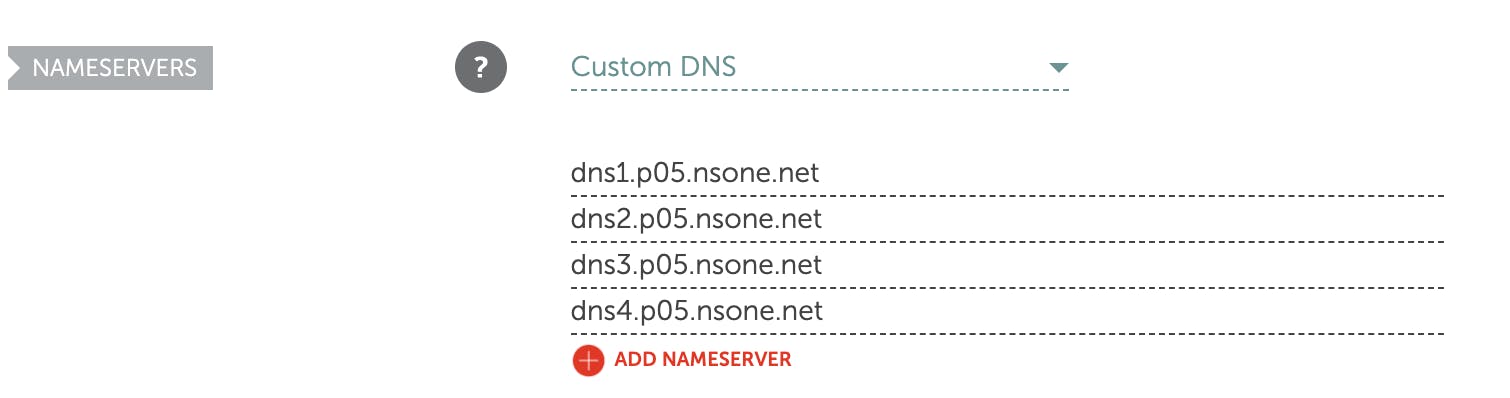
Locate the Nameservers settings, which should be initially set as "Namecheap BasicDNS"
Change the Nameservers setting to "Custom DNS"
Enter the four nameserver values provided by Netlify into the respective fields.
Save the changes.
By following these instructions, you will be able to update the Nameservers for your domain and incorporate the nameservers provided by Netlify.
After making the necessary changes to the DNS settings, please be aware that it may take some time for the updated settings to propagate across the internet. This propagation period is a normal part of the process and can vary in duration. Once the DNS settings have fully propagated, your personal website will be accessible through the custom domain you have configured.
THE END
Thank You for reading this article! I hope you found it informative and insightful. If you enjoyed it, please consider giving it a LIKE and sharing it with others who might benefit from it.
I'm always open to your suggestions and feedback, so feel free to leave your comments and ideas below. Your input is valuable in shaping the content I create. If you have any specific topics you'd like me to cover in my future articles, please let me know. I look forward to hearing from you and continuing this knowledge-sharing journey together!
Cheers 😊